
Well, we're finally here - The final (maybe) post in this series. We've gone over a lot of Docker stuff, and in this post, I'll break down how I setup this blog just over a week ago.
The Fun with Docker Series
Links to the entire series are here:
- Part 1 - Docker - An introduction
- Part 2a - Getting started with Docker
- Part 2b - More getting started with Docker
- Part 3 - Docker Compose
- Part 4 - Docker Volumes (and Bind Mounts)
- Part 5 - Docker Networking
- Part 6 - Monitoring your Docker setup with Portainer
- Part 7 - Setting up this blog with Let's Encrypt, Nginx, and Ghost (this post)
A brief history of my blogging saga
So, back in the (really) early 2000s, I started my first blog. I honestly don't remember what it was was about. It might have been hockey or maybe music related. Blogger shows some traces of stuff from 2002, but the content is long gone. I didn't really want to write, though. I set it up mostly to just play around with the blogging software and underlying dependencies like Apache and MySQL. I did this a number of times over the years, always stopping after 5 or 6 useless posts as I ran out of inspiration.
Is this time different?
I'm not sure yet, but I hope it is. This time I was actually inspired to write while I was learning, and I want to try to do that going forward. After this series is complete, I'll need to take a week or three off to write a chapter of a book that I'm working on, but then I can hopefully come back to blog more and learn other technologies. I will also be blogging on cisco.com and will link to those when that time comes.
One important note - This isn't intended to be a Docker-only blog by any stretch; Docker just happened to be what I was playing with when I decided to create it. I want to cover any number of technical topics, and maybe even some non-technical ones. If you have any suggestions for topics that you'd like me to learn and/or cover, please put them in the comments below or Tweet them at me @eiddor
The blog
As you might have figured out, this blog runs the Ghost blogging platform. The front-end is using Nginx as a web server (I recently abandoned Apache for no particular reason), and I'm also using Let's Encrypt to manage and renew my https certs because I'm really dumb when it comes to certificates.
Of course, I've taken it a step further; running Ghost in a Docker container, using the default SQLite back-end, and also running Nginx and Let's Encrypt in this amazing container (now known as SWAG) brought to you by the folks at LinuxServer.io who also create a lot of other useful Docker images.
My setup
So how did I set everything up? It was honestly a lot simpler and faster than I thought it would be. My docker-compose.yml file is below. If you've followed the series so far, most of this will be familiar to you.
version: '3'
services:
  ghost:
    image: ghost:latest
    container_name: ghost
    restart: unless-stopped
    environment:
      url: https://ccie.tv
    volumes:
      - /opt/ghost_content:/var/lib/ghost/content
 letsencrypt:
    image: linuxserver/swag
    container_name: swag
    restart: unless-stopped
    cap_add:
      - NET_ADMIN
    environment:
      - PUID=100
      - PGID=100
      - TZ=America/Chicago
      - URL=ccie.tv
      - SUBDOMAINS=www
      - VALIDATION=http
    volumes:
      - /opt/swag:/config
      - /var/www/html:/data/www
    ports:
      - 443:443
      - 80:80
Note: The
environment:section for Let's Encrypt is where the certificate "magic" happens. I won't cover it here, because again, I'm really dumb when it comes to certificates, but you can follow this guide for all of the Let's Encrypt details. It also has a ton of examples for reverse proxying to your containers. The guide is really useful and I learned a lot by reading it (except about certificates).
Another thing to note is that I keep both the Ghost and Let's Encrypt configuration files in /opt directories on my host. I try to do this with all of my Docker containers so that I can back up or move them easily. The only exception is the stuff in /var/www/html which is legacy content from when I used to Apache.
Did everything just work?
Of course not. I still had to setup the site and reverse proxy in Nginx, which wasn't too difficult once I found the correct reverse proxy configuration for Ghost.
Note: Reverse proxy is one of those weird hacks that seems to be different for every application that you're proxying for. The good news is that pretty much every application has a solution out there waiting to be found on Google. As mentioned, the guide referenced above will also help.
The Nginx configuration file that we need to edit for the Let's Encrypt/Nginx image that we're using is at: /config/nginx/site-confs/default (or /opt/swag/nginx/site-confs/default on the host).
Inside of this file, I used the following configuration to tell Nginx to reverse proxy anything going to https://www.ccie.tv/ to the Ghost container at http://ghost:2368
Here is the snippet from my Nginx configuration:
    location / {
                try_files $uri $uri/ /index.html /index.php?$args =404;
                proxy_set_header Host $host;
                proxy_set_header X-Real-IP $remote_addr;
                proxy_set_header X-Forwarded-Proto https;
                proxy_pass http://ghost:2368;
               }
Did you notice a concept that we learned earlier? We're referencing the Ghost container by its container name in the proxy_pass statement. This is because Docker Compose creates a user-defined network that allows this kind of reference.
That's really it! Some more notes below...
Customizing Ghost
In the configuration above, I'm mapping /opt/ghost_content on the host to /var/lib/ghost/content on the Ghost container. This will allow us to modify any Ghost configuration files; specifically any customizations we need to do in the themes.
Other stuff
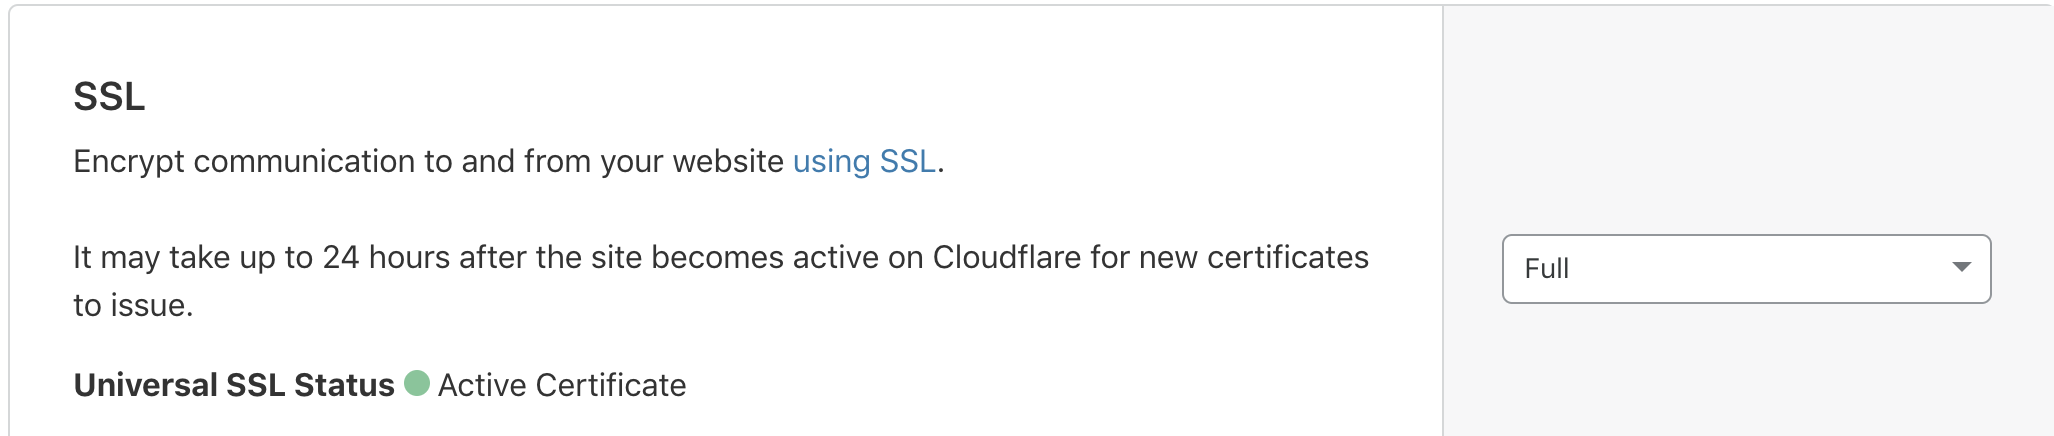
I did have a problem due to my using Cloudflare to proxy for my domain combined with automatically redirecting http to https on Nginx. Anyone trying to reach my domain with http would get a "Too many redirects" error.
The problem is that Cloudflare was proxying the http traffic to Nginx, but getting an https response back because of the Nginx redirect. The traffic would bounce back and forth until it gave that error. The fix was simply a matter of changing these three settings in the Crypto section of Cloudflare (I'm posting this mostly for my own reference because I'm sure to run into it again):


And here we are!
Whew, what a ride - In the last week or so, I've managed to churn out the whole series on Getting Started with Docker. I hope everyone has enjoyed reading it as much as I have enjoyed writing it.